How to Build Your Own Recycled Glass Shed
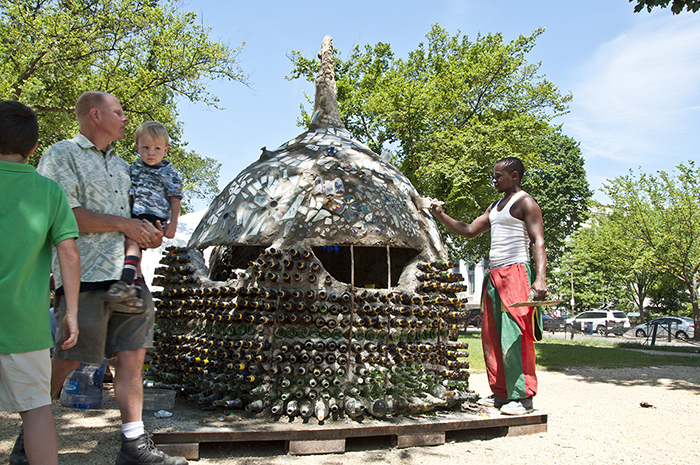
If you visited the 2014 Folklife Festival, you may have noticed a wacky construction in the Kenya program area with beer bottles and other odds and ends sticking out of the sides. This was the work of brothers Isaac and Patrick Kibe, and it was constructed entirely during the duration of the Festival, with all recycled and repurposed materials.
The Kibes live in Kitengela, an artist cooperative outside of Nairobi, devoting their time to making recycled art. While the structure on the National Mall was really more the size of a shed, and not designed to be a livable space, the Kibes make full-size, habitable houses as well.
After spending some time with Isaac and Patrick, I started to feel like I could do what they do. That’s certainly not true—they’re accomplished artists who make fantastically eccentric yet functional homes, but their construction process is simple enough that at the very least I can explain what they do.
Here is a step-by-step guide to building your own shed:
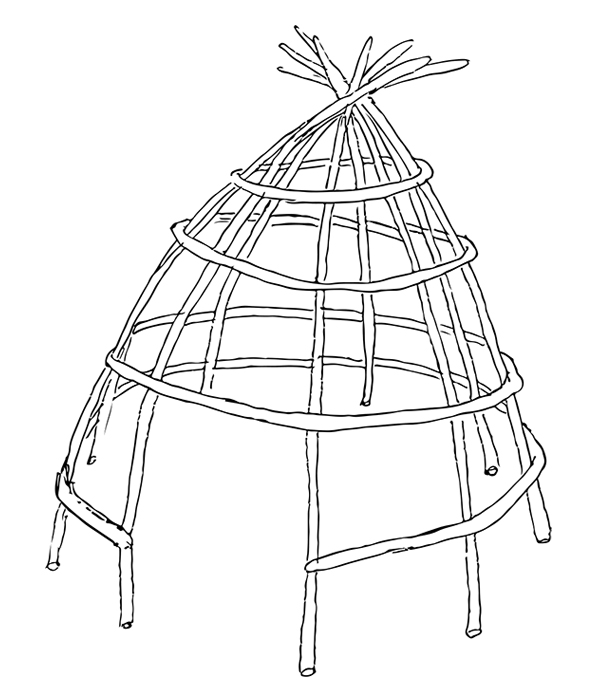
1. Building the Frame
Stand eight or ten lengths of rebar on end in the shape of a circle, and bend their tops to meet in the middle. Add horizontal rebar supports to hold all of the vertical posts in place, and attach them by wrapping wire around the intersections.
If you plan on leaving your shed in place, you can set the bottom ends of the rebar into the ground. The Kibes left their structure free-standing so the frame could be moved.

2. Covering the Frame
Lay chicken wire over the top two thirds of the frame and attach to the rebar using wire. For a simpler and less fragile structure, you can cover the entire frame with chicken wire and skip using the bottles in the next step. Cut out areas of chicken wire where you want windows or openings.
Once this is done, you have a light and portable frame, but after this point it becomes difficult to move. One of the challenges of the Festival was figuring out how to move the Kitengela shed to its next home!
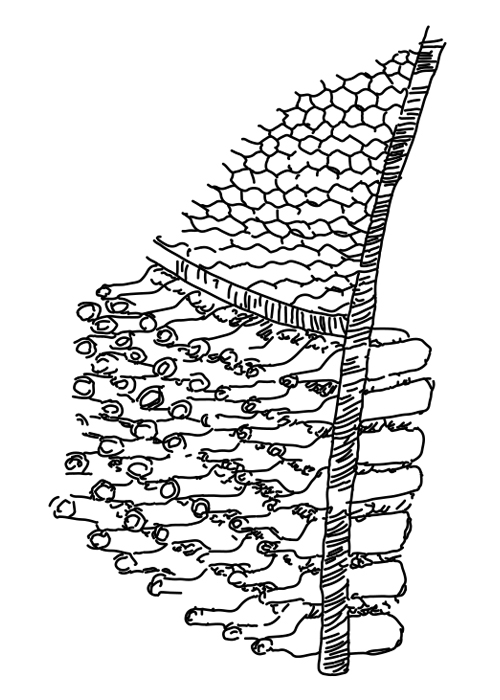
3. Adding Glass Bottles
At the bottom, place rows of glass bottles on their sides with layers of cement in between. Leave the tops and bottoms exposed so light can shine through.
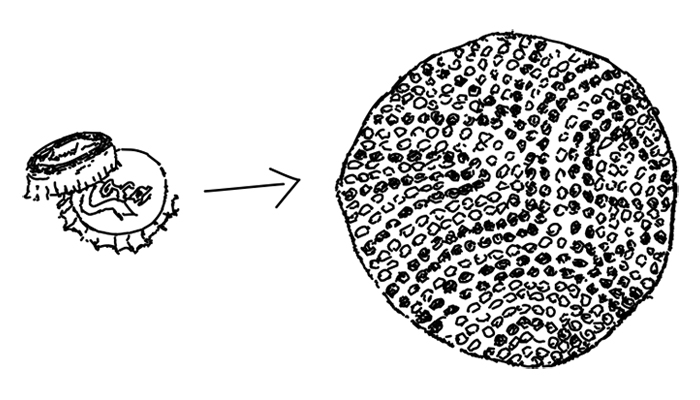
You can drink them all by yourself, but it’s more in the spirit of the Kitengela and the Kibe brothers to use bottles that are already discarded. Get your friends to send you theirs!

4. Decorating the Exterior
Once you have finished your bottle base, layer cement on the chicken wire and decorate it with all kinds of found materials. The Kibes use broken tiles, mirrors, ceramics, and bottle caps, but you can use anything you want to decorate your shed. It’s best to use anything that would normally go to waste.
5. Decorating the Floor
Design the floor of your shed in the same way, by lining it first with cement, and then add decorations as you see fit.
As long as you water the structure daily for at least a week after its completion to keep the cement from cracking, your structure can serve as a tool shed, meditation hut, dog house, or really anything. In fact, it is more in line with the Kibes’ philosophy of constant innovation to invent your own use for your structure. But at the very least, you will have a work of art!
Reilly Rosbotham is an intern for the Kenya program of the Smithsonian Folklife Festival. He is pursuing an undergraduate degree in anthropology and sociology at the University of Puget Sound.